As the Goods and Services Tax (GST), introduced in 2017, is a major tax reform aimed at unifying the Indian tax system, registering for it online is a necessary first step for businesses. This process streamlines the taxation system, promoting transparency and ease of doing business. GST registration is not just a legal mandate, it strategically impacts the way businesses operate and comply with tax regulations.
In this blog, we will guide you through the entire online GST registration process and break it down into 12 easy-to-understand steps. The online GST registration process can be confusing and time-consuming, nevertheless these steps will help you navigate it if you’re a new business owner or want to learn more about tax compliance.
Step-by-step Guide Explaining GST Registration Process Online
Any person or organization that provides goods or services in India must register for GST. Dealers with an annual turnover exceeding Rs 20 lakh (or Rs 40 lakh or Rs 10 lakh, depending on the state and type of goods) are obligated to register for GST.
Registration for GST requires the completion of the GST REG-01 form, which can be done online at no cost. The form consists of two parts, namely Part A and Part B. Accuracy in filling out both parts is essential, as an incomplete submission will result in the failure of the GST registration process.
To make the registration process easier, the Ministry of Finance (MoF) has streamlined it.
Applicants can now directly visit the GST portal to register under GST. Once submitted, the application will immediately generate an ARN on the GST portal. To check the status of the application and ask any questions, the applicant can use the GST ARN. The GST Registration Certificate and GSTIN will be sent to the concerned person within 7 days of ARN generation.
Step 1: Visit the GST Portal
Go to the GST Portal: www.gst.gov.in/ > Services -> Registration > New Registration option

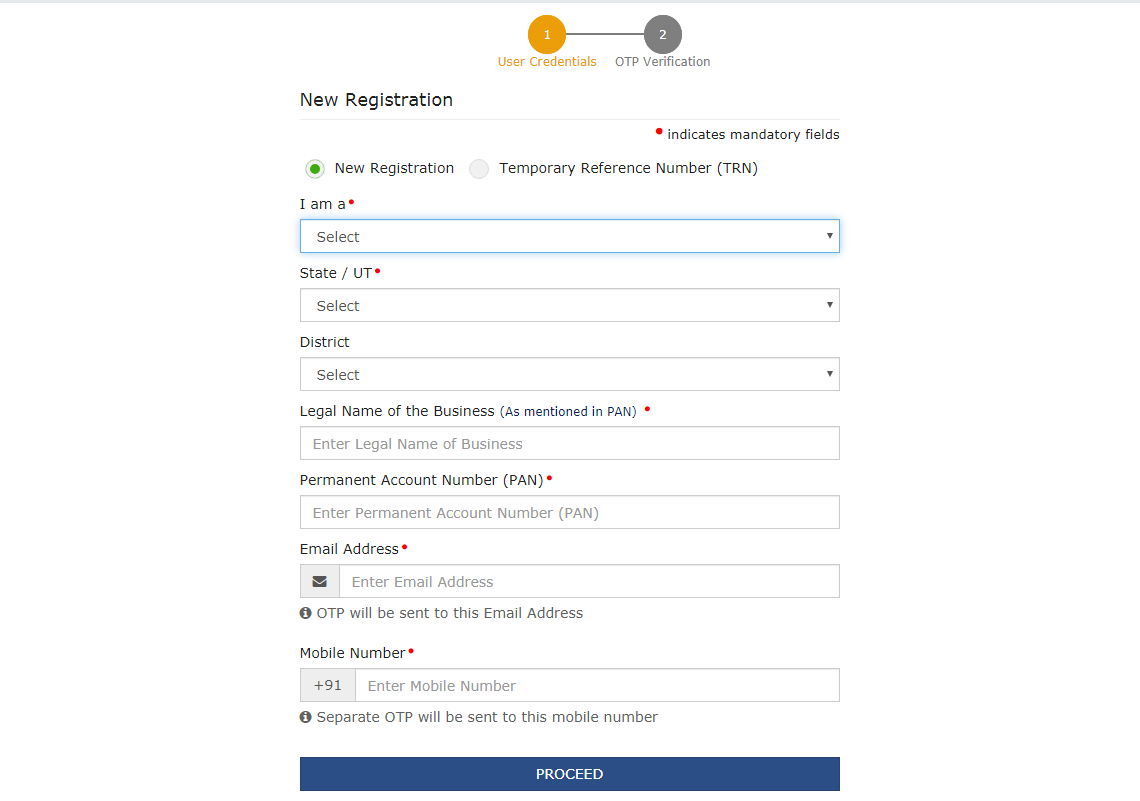
Step 2: Complete the OPT Verification
Users must select New Registration on the new GST registration page. The applicant must continue to complete the application using the Temporary Reference Number (TRN) if the application for GST registration is still not complete.
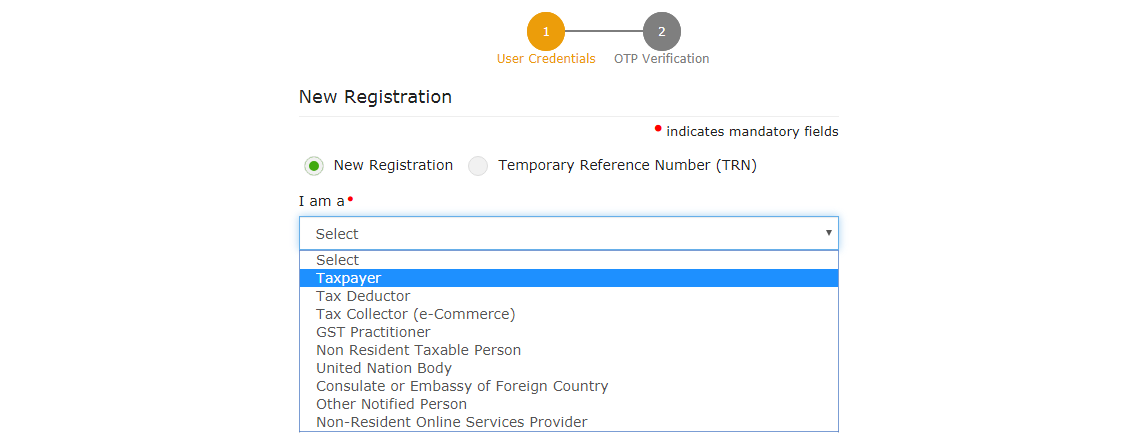
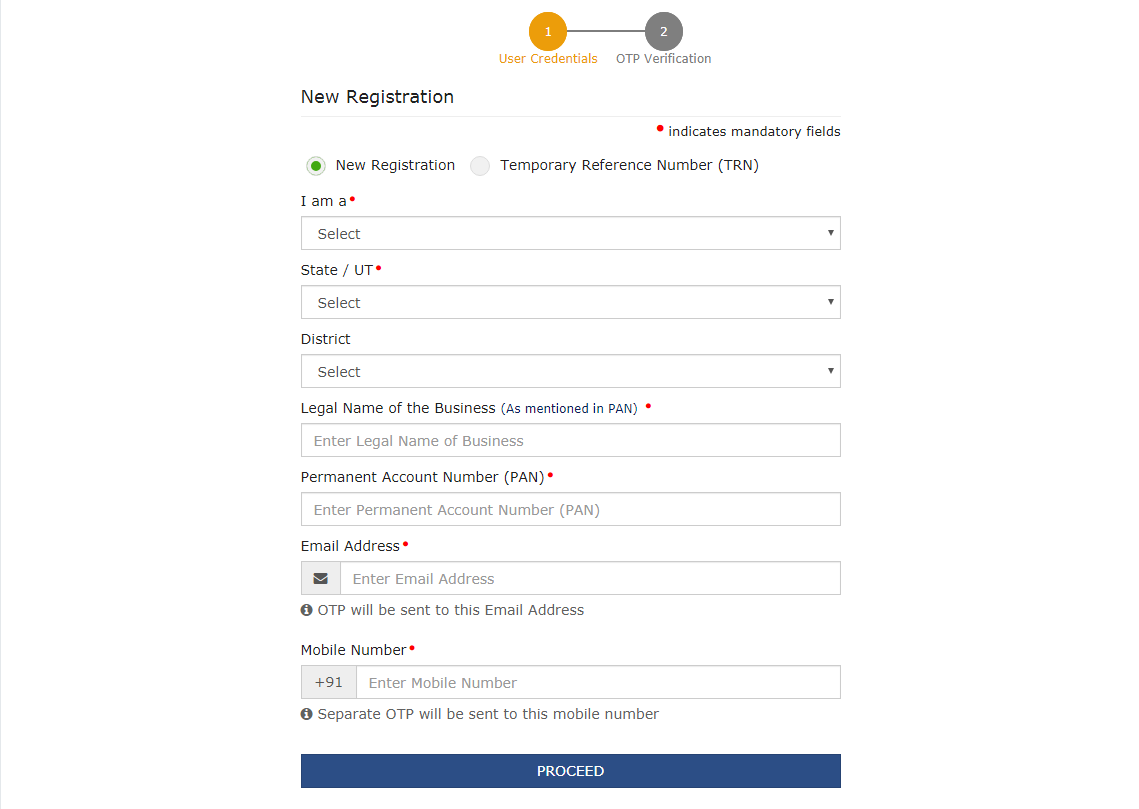
- Select the taxpayer type from the list of options.
- Select the state according to the needs.
- Enter the legal name of the company or entity as it appears in the PAN database. The applicant should enter the details given on the card as the portal automatically checks the PAN.
- Enter the PAN number of the owner or company in the Permanent Account Number (PAN) field. PAN and GST registrations are linked. In this scenario, enter the PAN number of the company or limited liability company (LLP).
- Enter the email address of the primary authorized signatory. (Will be verified in the next step)
- Lastly, click on the ‘PROCEED’ option
Step 3: Generate TRN
Upon successfully furnishing all the above-mentioned details, the OTP verification page is displayed. The OPT will remain valid for the next 10 minutes. Two different OPTs will be sent to validate your mobile number and email address.
Znajdź legalne kasyna online w Polsce na pl.kasynopolska10.com/legalne-kasyna, partnerze naszej strony recenzującej kasyna online – kasynopolska10.
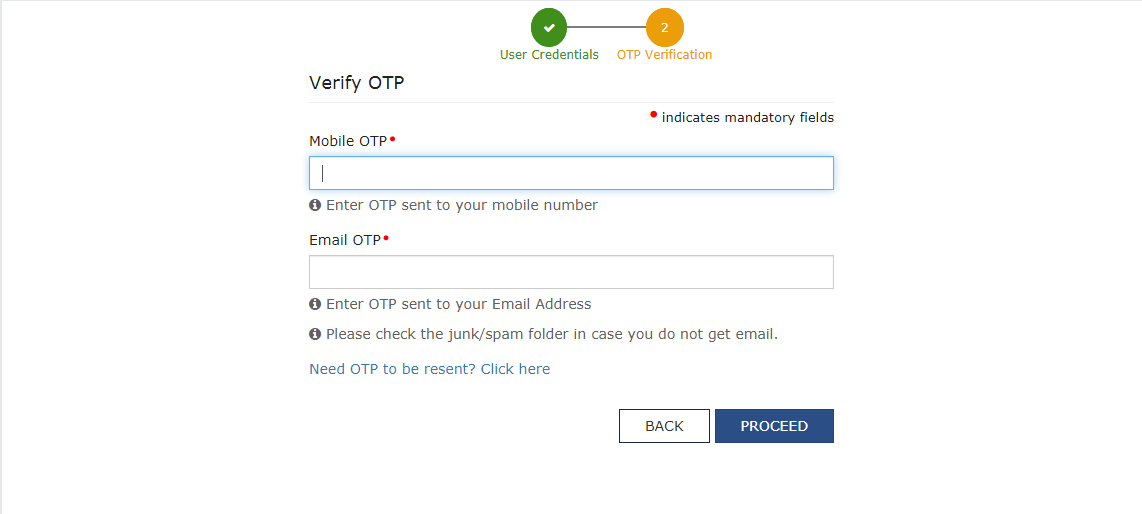
- Enter the OTP, on the Mobile OTP field
- Enter the OTP, on the Email OTP field.
Step 4: Generate TRN
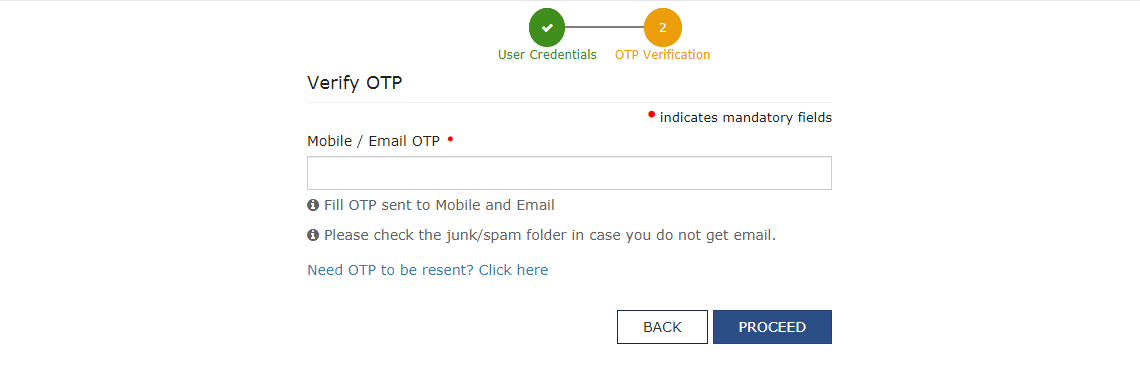
Once the OTP verification is successful, the TRN will be generated. Now the applicant must use this TRN to complete and submit GST registration application.

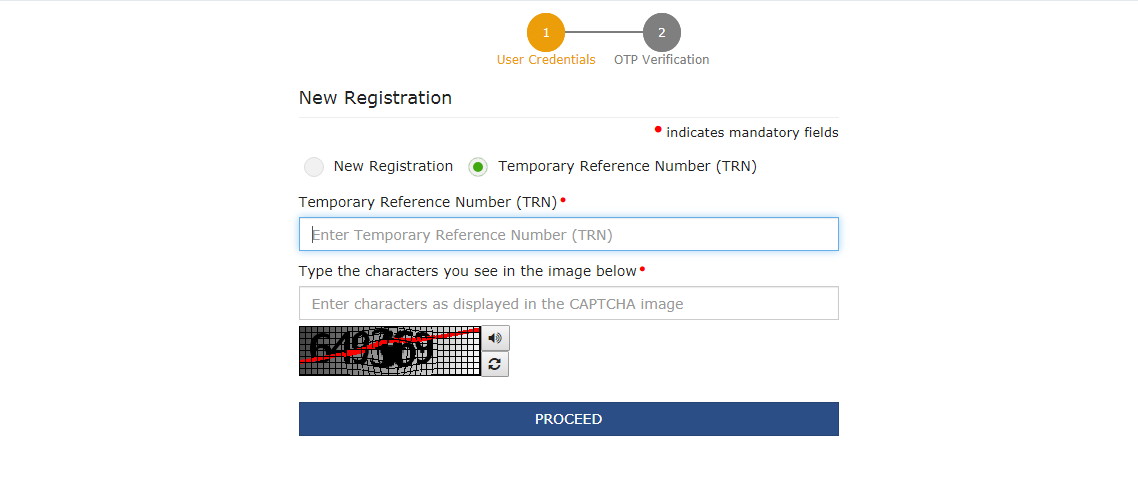
Step 5: Use the TRN to Log in
Enter the TRN generated and type the CAPTCHA as shown on the screen.
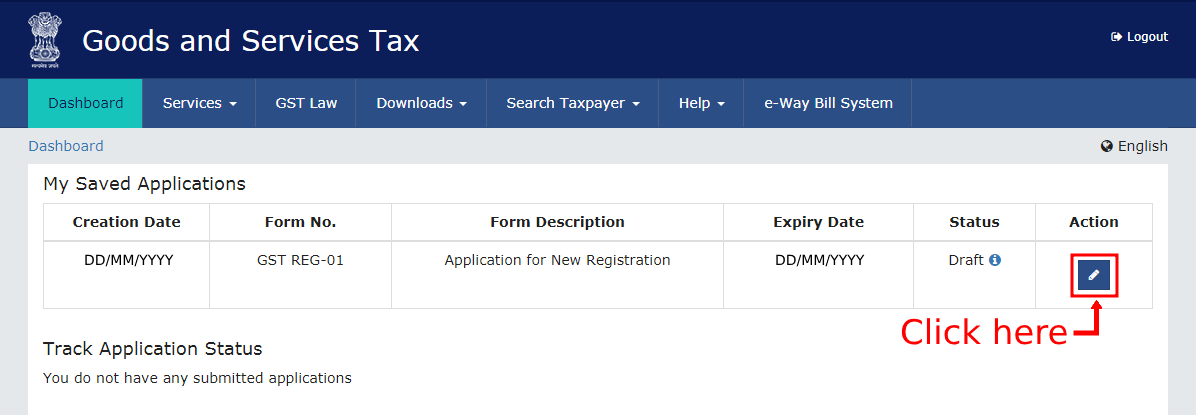
To start with the GST registration process, click on the RED colored icon.
Step 6: Submit Business Information
Applicants must submit a bunch of information to register under GST. Business data must be entered on the first tab.
- Enter the business trade name under the Trade Name field.
- Enter Business Constituency from the drop-down list.
- Select District and Sector/Circle/Division/Charge/Unit from the drop-down menu.
- Select the correct option from the drop-down lists for Commissioner Code, Division Code and Range Code.
- If necessary, choose a composition scheme.
- It is necessary to enter the date of establishment of the business and select the date of registration.
- This date represents the date the company meets the GST registration requirements in aggregate turnover.
- Taxpayers must apply for a new GST registration within 30 days of the date of registration obligation.
Step 7: Input Promoter Details
Provide details of promoters and directors. For proprietorship, submit proprietor information. For GST registration, details of up to 10 proprietors or partners can be provided.
Here’s what proprietors must submit:
- Enter stakeholder details like name, DOB, address, gender, email id, and mobile number.
- Enter Promoter designation
- Promoter DIN for the following:
- Private Limited Company
- Public Limited Company
- Unlimited Company
- Public Sector Undertaking
- Foreign Company registered in India
- Citizenship details
- PAN and Aadhaar details
- Residential address
Applicants providing Aadhaar details can use the Aadhaar e-sign instead of a digital signature for filing GST returns.
Step 8: Provide Authorized Signatory Details
The authorized signatory is the person designated by the founder of the company who is in charge of submitting the company’s tax returns. They also have the responsibility of keeping the business compliant. In this capacity, the authorized signatory processes various transactions on behalf of the promoters and has full access to the GST portal.
Step 9: Enter Details of Primary Business Place
The applicant must provide information about the primary place of business in this section. The principal place of business is the address where the taxpayer conducts business in the state primarily. These are usually records and ledgers. The registered office is the principal place of business of a company or limited liability company.
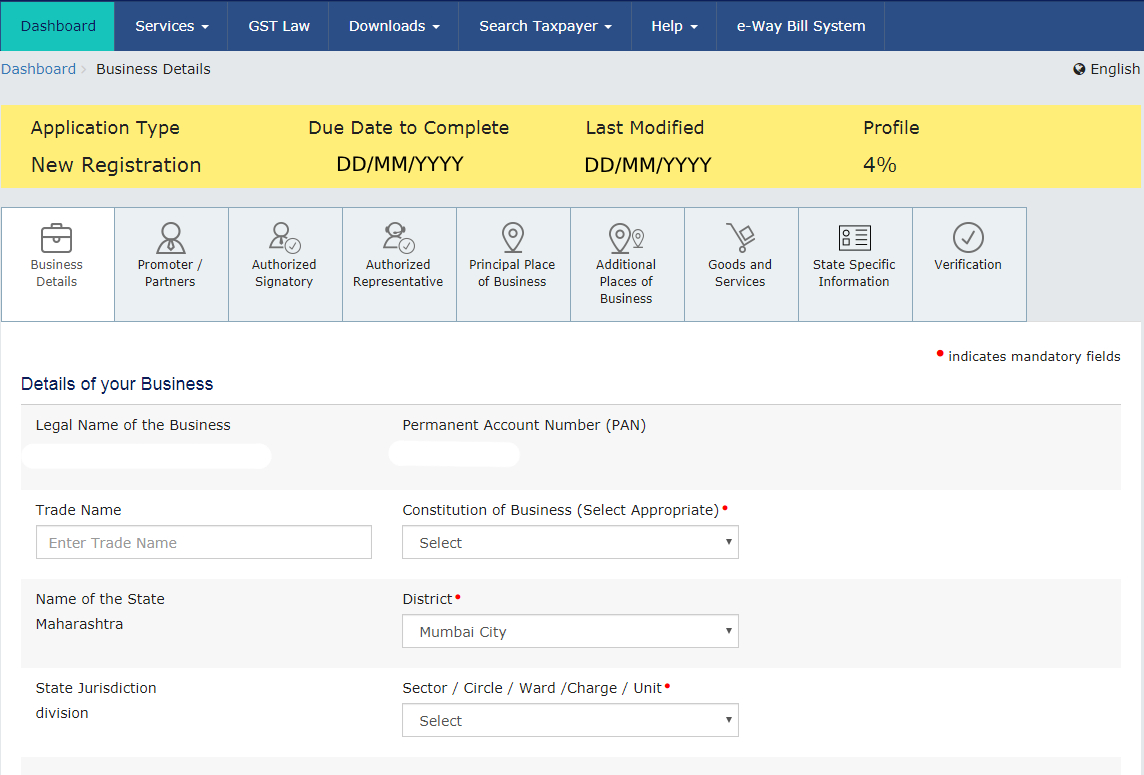
For the principal place of business, the user must enter the following information:
- Registered office business
- Official contact details, including telephone number along with STD codes, mobile number and fax number, email address.
- Nature of premise possession
The user must upload the required documentation and certificates from the Government of India if the applicant is acting as a SEZ developer or if the principal place of business is located in the SEZ by choosing ‘Other’ in the Nature of possession of premises drop-down menu and attaching the relevant document.
The user must upload the following documents in this section to prove their ownership or occupation of the property:
- For own property: Any papers proving ownership, such as copy of electricity bill, copy of Municipal Office Khata or latest property tax certificate.
- For leased or rented premises: A copy of the current lease or rental agreement along with any documentation proving the landlord’s ownership of the property, such as a copy of the Municipal Office Khata, a copy of the electricity bill or the latest property tax receipt.
- For premises not listed above: A copy of the consent letter together with any documentation proving ownership of the approver’s premises, such as a copy of the electricity bill or Municipal Khata. The same documents can be posted for shared properties.
If the user has another place of business, he must enter the details of the property in this tab. The location may be added as additional place of business, for example if the applicant uses the seller’s warehouse and is a seller on Flipkart or another e-commerce portal.
Step 10: Details of Goods and Services
Here, the taxpayer must enter information about the top five products and services supplied. The user must enter the SAC code for the services provided and the HSN code for the goods provided.
Step 11: Bank Account Details
Here, the applicant must enter the number of bank accounts held and details of all the mentioned accounts, like bank account number, type of account and IFSC code, and upload a copy of passbook or bank statement in the required field.
Step 12: Application verification and ARN Generation
- In this step, the user must confirm the information provided in the request before submitting the same.
- After the verification is complete, the user must check the verification box. The name of the authorized person must be selected from the drop-down list. The place where the form is filled must be entered by the user.
- Finally, a Digital Signature Certificate (DSC) / electronic signature or EVC must be used to digitally sign the application. Digital signatures through DSC are necessary for LLPs and Companies.
- An application success notification will be displayed upon signing the application.
- Applicants will then receive a confirmation on email address and mobile number. An Application Reference Number (ARN) confirmation will be sent to the email address and mobile phone number.
- The GST ARN can be used to track the application status.
Track Application Status in GST Registration Process
The Goods and Services Tax (GSTN) recently introduced a new feature on the GST portal known as the Track Application Status tab. This addition is integrated into the GST registration process. Individuals requiring the submission of supplementary clarifications can conveniently access this tab by logging in with their Temporary Reference Number (“TRN”). Notably, in the past, monitoring the application status necessitated a separate action outside the Registration Dashboard on the GST Portal.
Documents Needed For GST Registration
For Sole proprietor / Individual
- Owner PAN details
- Owner Aadhaar details
- Owner photograph
- Bank account details
- Address proof
For HUF
- PAN and Aadhaar card of HUF
- Bank account details
- Address proof of principal business location
- Photograph of owner
- PAN card of HUF
Partnership Firm/LLP
- PAN card of all partners
- Bank account details
- Aadhaar card of authorized signatory
- Partnership deed copy
- Photograph of all partners and authorized signatories
- Proof of appointment of authorized signatory
- Registration certificate / Board resolution of LLP
- Address proof of partners (Passport, driving license, Voters identity card, Aadhaar card etc.)
For Company (Private/ Public/ Indian/ Foreign)
- Company PAN
- Certificate of incorporation given by Ministry of Corporate Affairs
- PAN card and Aadhaar card of authorized signatory. The authorized signatory must be an Indian even in case of foreign companies/branch registration
- PAN card and address proof of all directors of the Company
- Bank account details
- Articles of Association / Memorandum of Association
- Address proof of principal business location
- Photograph of all directors and authorized signatory
- Board resolution appointing authorized signatory / Any other proof of appointment of authorized signatory
For queries related to GST, please get in touch with us. IRIS GST is looking forward to helping you.
IRIS is now a government-authorized IRP along with being an ASP+GSP.
If you are looking for an invoice preparation solution, IRIS Peridot Plus is the best answer. From effortless e-invoicing to automated collections, instant payouts, and easy reconciliations, IRIS Peridot Plus is your best call.





















This information really helps me with giving these 12 steps how to do Gst Registration online.This proper method of doing GST Registration allows me to do register my business easily which is compulsory for every business according to the CGST Act 2017.
This information really helps me with giving these 12 steps how to do Gst Registration online.
This blog helped me for my GST registration information.